


After demonetization in India, it became very convenient for me to use e-wallet services, especially when I found out that even my “Tapri Wala” accepted PayTM payment.
In fact, using PayTM gave me a clear idea about where and when I spent my money and helped me keep track of it which I never thought would be possible.
All was going fine until last year October 2017 when RBI declared that for transactions with e-wallets, a KYC procedure will be mandatory.
This move was in regards to stopping identity theft, fraud, money laundering and other illegal activities. The move felt legitimate at first but similar to demonetization, it felt hastened and unplanned.
The last date kept on extending and then finally on February 28th, PayTM KYC became mandatory. So, when I signed up for a new account after 28th Feb, I had to provide the details for minimum KYC while creating the account itself which is now mandatory for all new users.
There are 2 types of KYC in the PayTm app: Minimum KYC and Full KYC.
In minimum KYC, you have to provide your Pan Card or Aadhar Card number without having to verify it. The second being the full detailed KYC, asks you to complete a biometric identification at KYC centres.
But, I found that the minimum KYC is almost of no use. The money in your wallet is limited only for commercial transactions like mobile bills, cab fares, etc. and with a spending limit of Rs. 10,000 per month. Therefore, it was better to do the complete KYC.
Here’s how you can complete your PayTM KYC:
If you are seeing an option of ‘Get your KYC done’ you should follow these steps-
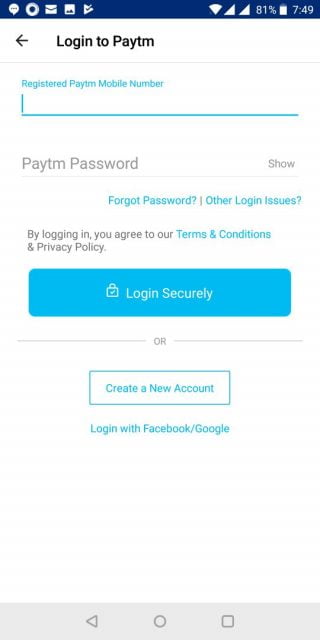
Step 1: Login to your PayTM account using your email address or phone number.
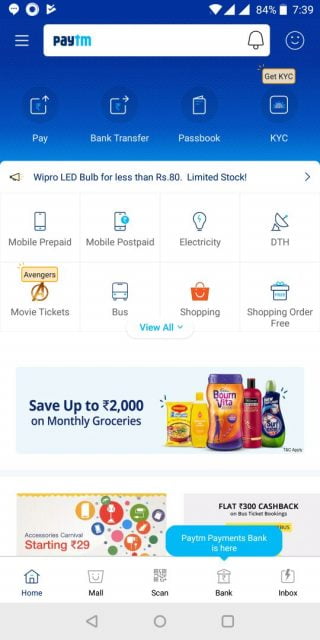
Step 2: Tap on the KYC option. Usually the fourth option, right in front.
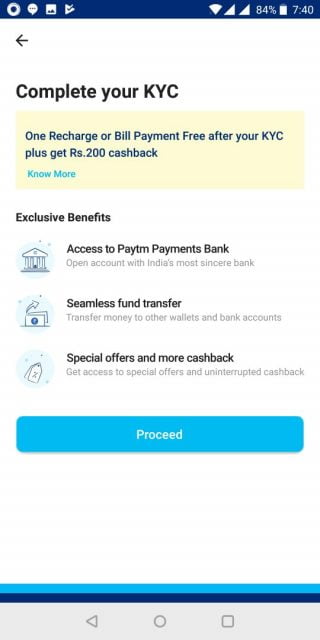
Step 3: Click on “Proceed”. You will get an option to add your Aadhar card number.
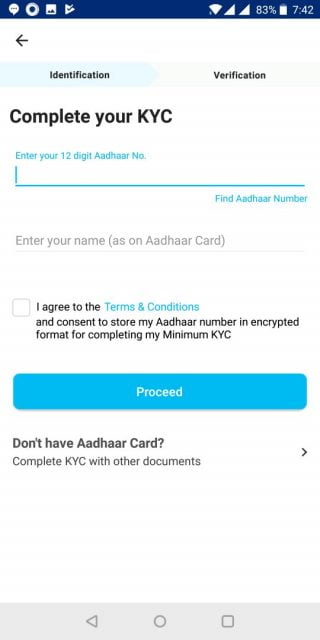
Step 4: Add your 12 digit Aadhar Number and your name as per on your Aadhar card, agree to the terms and conditions and proceed.
Step 5: After adding the Aadhar card number, you will get an option to complete the verification by receiving OTP on the number which you have linked to your Aadhar. If you have registered on PayTM with the same number that is linked to your Aadhar, you will get an instant OTP or else you can scroll down and click on ‘Haven’t Got OTP’.
Step 6: If you get an OTP, add it and it’s done. If you click on ‘Haven’t got OTP’, you will get an option to complete your KYC at the nearest PayTM KYC centre.
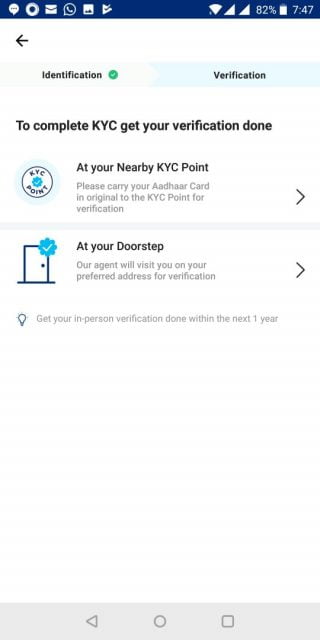
They are almost everywhere; right from general stores and even clinics at some places. There is a new option of PayTM KYC agents coming at your doorstep for verification which didn’t exist before.
Step 7: Visit the nearest PayTM KYC centre and complete the KYC by verifying your Aadhar card by biometric identification, OTPs, and more details. You will get the list of KYC centres nearest to you after clicking on the ‘At your nearby KYC point’ option.
Once completed, you will immediately be able to use your PayTM account for every transaction with an unlimited spending limit and store up to Rs. 1 lakh in your wallet.
Know that your normal everyday shops which accept PayTM do not come under commercial transactions so you will have to get your KYC done for paying them through your e-wallet.
Related: Is The Ola Uber Merger On Cards In India Brokered By Common Investor Softbank?
Although, the procedure does have its fair share of hiccups:
People have complained about their accounts being frozen even after completing KYC.
My old account was frozen even after completing KYC and even after many calls and emails to customer care, there was no solution. I had to make a new account because I was tired of begging them for my own money.
Another member of our team tried completing her KYC. It was never successful and like me even she had to make new account altogether.
The PayTM KYC centres charge you for completing your KYC even though PayTM claims that the service is free. More often than not even they are not able to complete your KYC due to ever existing server issues.
With data leaks everywhere, it causes angst among everyone on how secure their servers might be. But for now, make sure you see the Golden Gate app on the vendor’s phone while completing your KYC. It is the only means of completing PayTM KYC.
Happy PayTM-ing or not!
Image Credits: Google Images
Sources: TimesNow, Medium, PayTM + more
You Would Also Like To Read :
http://edtimes.in/2018/04/heres-what-to-do-if-an-atm-gives-you-fake-notes/


Paytm kyc problem
Remve aadher kyc
Remove kyc paytm
K Y C program Meri Khwahish nahi ho Pa rahi hai batao Main Kya Karoon
Kyc kaise hoga or Khan pr hoga please tell me 8318858445
Follow the steps mentioned above in the same order as mentioned. That should do the trick
Sir paytm kyc ka option nhi as RHA h tho iis me liye kya karna yoga please
Muje apne paytm ki ekyc karni he please help me
paytm kyc